
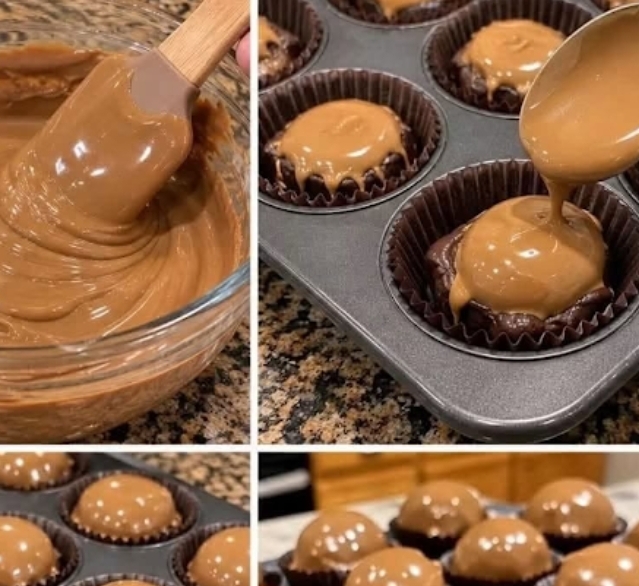
Make Caramel-Filled Chocolate Cups
Step 1: Prepare Your Muffin Tin
Prepare your muffin tin: Line a 12-cup standard muffin tin with dark brown paper cupcake liners. Set aside.
Step 2: Melt the First Batch of Chocolate
Melt the first batch of chocolate: In a microwave-safe glass bowl, melt 1.5 cups of the chocolate chips. Heat in 30-second intervals, stirring well after each, until smooth and fully melted. Alternatively, use a double boiler.
Step 3: Create the Chocolate Bases
Create chocolate bases: Spoon about 1-2 tablespoons of melted chocolate into the bottom of each paper liner, spreading it slightly up the sides to form a base. Place the muffin tin in the refrigerator or freezer for 10-15 minutes, or until the chocolate is firm.
Step 4: Make the Caramel Filling
Make the caramel filling: While the chocolate bases chill, combine the sweetened condensed milk, butter, brown sugar, and salt in a medium saucepan over medium-low heat. Stir constantly until the butter is melted and the sugar is dissolved, and the mixture begins to thicken and turn a light caramel color (about 8-10 minutes). Remove from heat and stir in the vanilla extract.
Step 5: Fill the Chocolate Cups with Caramel
Fill the chocolate cups with caramel: Once the chocolate bases are firm, spoon about 1-2 tablespoons of the caramel filling into each chocolate cup, leaving a small space at the top for the final chocolate layer. Return the muffin tin to the refrigerator or freezer for another 15-20 minutes, or until the caramel is firm.
Step 6: Melt the Remaining Chocolate
Melt the remaining chocolate: Melt the remaining 1/2 cup of chocolate chips using the same method as before (microwave or double boiler).
Step 7: Add the Chocolate Tops
Top with chocolate: Once the caramel is firm, spoon the melted chocolate over the caramel layer in each cup, spreading it gently to cover the caramel completely and create a smooth top. Gently tap the muffin tin on the counter a few times to release any air bubbles and help the chocolate settle evenly.
Step 8: Chill Until Set
Chill until set: Return the muffin tin to the refrigerator for at least 30-60 minutes, or until the chocolate cups are completely firm. Once set, carefully remove the caramel-filled chocolate cups from the muffin tin and enjoy!
Tips for the Best Caramel Chocolate Cups
Making homemade chocolate candy is easier when you pay attention to a few important details.
1. Melt the Chocolate Slowly
Chocolate can become thick or grainy if overheated. Use short microwave intervals and stir frequently, or melt it gently over a double boiler. Make sure no water gets into the chocolate.
2. Create Even Chocolate Shells
Spread the melted chocolate across the bottom and slightly up the sides of each liner. A reasonably even shell helps hold the caramel filling and makes the finished cups easier to handle.
3. Allow Each Layer to Set
Do not rush the chilling stages. The chocolate base needs to become firm before you add the filling, and the caramel needs to firm up before you cover it with the final chocolate layer.
4. Avoid Overfilling the Cups
Leave room for the top chocolate coating. Too much caramel can make it difficult to seal the cups properly, and the filling may leak out when you remove the liners.
5. Stir the Caramel Constantly
Keep stirring the caramel mixture over medium-low heat so it heats evenly and does not scorch on the bottom of the saucepan. Remove it from the heat once it has thickened and developed a light caramel color, as described in the recipe.
6. Make the Tops Smooth
After adding the final chocolate layer, gently tap the muffin tin on the counter. This helps the chocolate settle into an even coating and releases trapped air bubbles.
7. Let the Cups Set Completely
Wait until the chocolate cups are completely firm before removing them from the muffin tin. This helps the shells hold their shape and gives the candies a neater appearance.
Suggested ad placement: After the cooking tips section.
Ingredient Substitutions and Variations
One of the best things about homemade chocolate cups is how easily you can customize them. Keep the original recipe as written or experiment with these optional ideas.
Salted Caramel Chocolate Cups
For a popular sweet-and-salty combination, sprinkle a small pinch of flaky sea salt over the caramel before adding the final chocolate layer. You can also add a little salt to the finished cups.
Dark Chocolate Caramel Cups
Use dark chocolate for a deeper, less sweet flavor that contrasts nicely with the rich caramel filling.
Milk Chocolate Cups
Milk chocolate creates a sweeter, creamier chocolate shell. It is a good option if you prefer classic candy-shop flavors.
Nutty Caramel Chocolate Cups
Add finely chopped pecans, walnuts, or almonds to the caramel filling for extra crunch. Make sure the pieces are small enough to distribute evenly.
Coconut Caramel Cups
Mix a small amount of shredded coconut into the filling for a coconut-inspired variation.
Mini Caramel Chocolate Cups
Use a mini muffin tin and smaller paper liners to create bite-sized candies. Smaller cups may require adjustments to the amount of chocolate and caramel used per portion.
Decorative Chocolate Cups
Drizzle contrasting melted chocolate over the finished cups or add festive sprinkles for birthdays, holidays, and special occasions.
Can You Make These Dairy-Free?
A dairy-free version may be possible with dairy-free chocolate, a suitable dairy-free condensed milk alternative, and vegan butter. Because these substitutions can behave differently during heating and setting, the texture and flavor may not match the original recipe.
Are Caramel-Filled Chocolate Cups Healthy?
These caramel-filled chocolate cups are best enjoyed as an occasional dessert. Chocolate, butter, sweetened condensed milk, and brown sugar contribute sweetness, fat, and calories, so these candies are not a low-sugar or low-calorie snack.
That does not mean you cannot enjoy them as part of a balanced eating pattern. A healthy diet can include desserts alongside meals that provide vegetables, fruit, whole grains, and sources of protein.
Can These Chocolate Cups Fit Into a Weight-Loss Plan?
Yes, an occasional sweet treat can fit into a weight-management plan. Portion size and your overall eating pattern matter more than avoiding every dessert.
Because these candies are rich, one cup may be satisfying on its own. If you are tracking calories or sugar, consider the size of each cup and the ingredients used. Exact nutritional values will depend on the chocolate brand and the final yield.
Are These Homemade Candies Better Than Store-Bought Candy?
Making candy at home gives you control over the ingredients and lets you choose the type of chocolate and the amount of salt used. However, homemade candy is not automatically lower in sugar, fat, or calories. The main benefit is the ability to customize the recipe and enjoy freshly prepared treats.
Calories and Nutrition
The recipe contains chocolate, sweetened condensed milk, butter, and sugar, all of which contribute to its nutritional profile. Exact values depend on the brands you use and how evenly the mixture is divided among the 12 cups.
For accurate nutrition information, calculate the recipe using the labels on your actual ingredients and divide the totals by 12 servings. Without brand-specific nutrition data, a precise calorie or macronutrient estimate would be unreliable.
When estimating nutrition, consider:
- Calories: Primarily contributed by the chocolate, butter, condensed milk, and sugar.
- Carbohydrates: Mainly from the sugars and chocolate.
- Fat: Primarily from the chocolate and butter.
- Protein: Present in smaller amounts from the chocolate and condensed milk.
- Sugar: A notable component because the recipe contains sweetened condensed milk and brown sugar.
If you are monitoring calories or sugar intake, check the product labels and consider enjoying one cup at a time.
Serving Suggestions
These caramel chocolate cups are rich enough to serve on their own, but they also work beautifully as part of a larger dessert spread.
- With coffee or espresso: The slightly bitter flavor of coffee complements the sweetness of the caramel.
- With cold milk: A classic pairing for chocolate desserts.
- On a holiday dessert platter: Arrange the cups with cookies, brownies, and other small sweets.
- As homemade gifts: Place the completely set cups in a food-safe gift box or candy container.
- For parties: Serve them in mini paper liners on a dessert table for an elegant presentation.
For the neatest presentation, keep the cups chilled until you are ready to arrange them on a platter.
Storage Instructions
How to Store Caramel-Filled Chocolate Cups
Store the cups in an airtight container at room temperature for up to one week, provided the room is cool and the ingredients and handling conditions allow safe storage. If your kitchen is warm, or if the filling does not remain firm, refrigerate them instead.
The recipe’s original storage guidance also allows refrigeration for up to two weeks. Keep the container sealed to protect the chocolate from moisture and unwanted odors. For the best texture, let refrigerated cups sit at room temperature for about 15–20 minutes before serving, if conditions permit.
Can You Freeze Caramel Chocolate Cups?
Yes. Arrange the cups in a single layer on a baking sheet and freeze until firm. Transfer them to an airtight, freezer-safe container or bag and freeze for up to 2–3 months for best quality.
Thaw them in the refrigerator overnight or at room temperature for a few hours before serving. Avoid exposing cold chocolate to sudden moisture or condensation, which can affect its appearance.
Do These Chocolate Cups Need Reheating?
No. These candies are meant to be enjoyed at room temperature or chilled. Allow refrigerated cups to soften slightly before serving if you prefer a softer caramel texture.
Frequently Asked Questions
Can I use store-bought caramel?
Yes, a good-quality store-bought caramel sauce can work, but it should be thick enough to hold its shape when chilled. A runny sauce may seep into the chocolate shell and make the cups difficult to handle. The original recipe uses a homemade caramel-style filling made with condensed milk, butter, and brown sugar.
Why did my chocolate seize?
Chocolate can seize when it comes into contact with even a small amount of water or becomes overheated. Use completely dry bowls and utensils, heat the chocolate gently, and stir frequently.
Can I freeze these chocolate cups?
Yes. Freeze the finished cups until solid, then transfer them to an airtight freezer-safe container. They can be frozen for about 2–3 months for best quality. Thaw before serving.
How do I make the chocolate shiny?
Properly tempered chocolate generally produces a shinier finish and a firmer snap. If you are not tempering the chocolate, melt it gently and avoid overheating. The final appearance can vary depending on the type of chocolate and how it cools.
Can I make these caramel chocolate cups ahead of time?
Yes. These are useful make-ahead treats because they need time to chill and set. Prepare them in advance, store them in an airtight container, and keep them cool until serving.
You May Also Like
If you love homemade candy and easy dessert recipes, try these ideas next:
- Homemade Peanut Butter Chocolate Cups – Chocolate shells filled with creamy peanut butter.
- Easy Chocolate Truffles – Rich bite-sized treats for dessert platters and gifts.
- Salted Caramel Brownies – Fudgy brownies with sweet caramel and a hint of salt.
- Chocolate-Covered Pecans – A crunchy, chocolatey treat for holiday snacking.
- No-Bake Chocolate Peanut Butter Bars – An easy dessert for chocolate and peanut butter fans.
- Homemade Chocolate Fudge – A classic sweet treat for parties and edible gifts.
Final Thoughts
These homemade caramel-filled chocolate cups bring together two favorite flavors: rich chocolate and buttery caramel. They look elegant, taste indulgent, and make a lovely treat for holidays, parties, and homemade gifts.
Take your time with the chocolate layers, let each stage chill properly, and finish with a little flaky sea salt if you enjoy the sweet-and-salty combination. Once you make a batch, you may find yourself saving this recipe for every special occasion—or simply for the moments when a homemade chocolate treat sounds just right