There is a very specific kind of magic that happens when you set a beautifully chilled, creamy pie on the kitchen table. The crust is perfectly flaky, the filling is velvety and rich, and the crunch of toasted nuts in every bite just makes you want to close your eyes and savor the moment. If you are a fan of classic, comforting desserts that taste like they came straight from a vintage bakery, you are in for a real treat.
Today, we are making a gorgeous Walnut Cream Pie. If you’ve ever enjoyed a classic Pecan Cream Pie, you already know the joy of that creamy, nutty combination. But walnuts bring a slightly earthier, richer, and more buttery flavor to the table that is absolutely unforgettable.
Best of all? This is a no-bake wonder. It requires absolutely zero time standing over a hot stove, making it the perfect “fake it till you make it” dessert for busy days, family potlucks, or whenever you just want something sweet to pair with your afternoon coffee. Grab your favorite mixing bowl, and let’s create a little slice of heaven.
Why This Recipe Will Become Your New Go-To
- Zero Baking Required: The filling sets up beautifully in the fridge, keeping your kitchen cool and your effort to an absolute minimum.
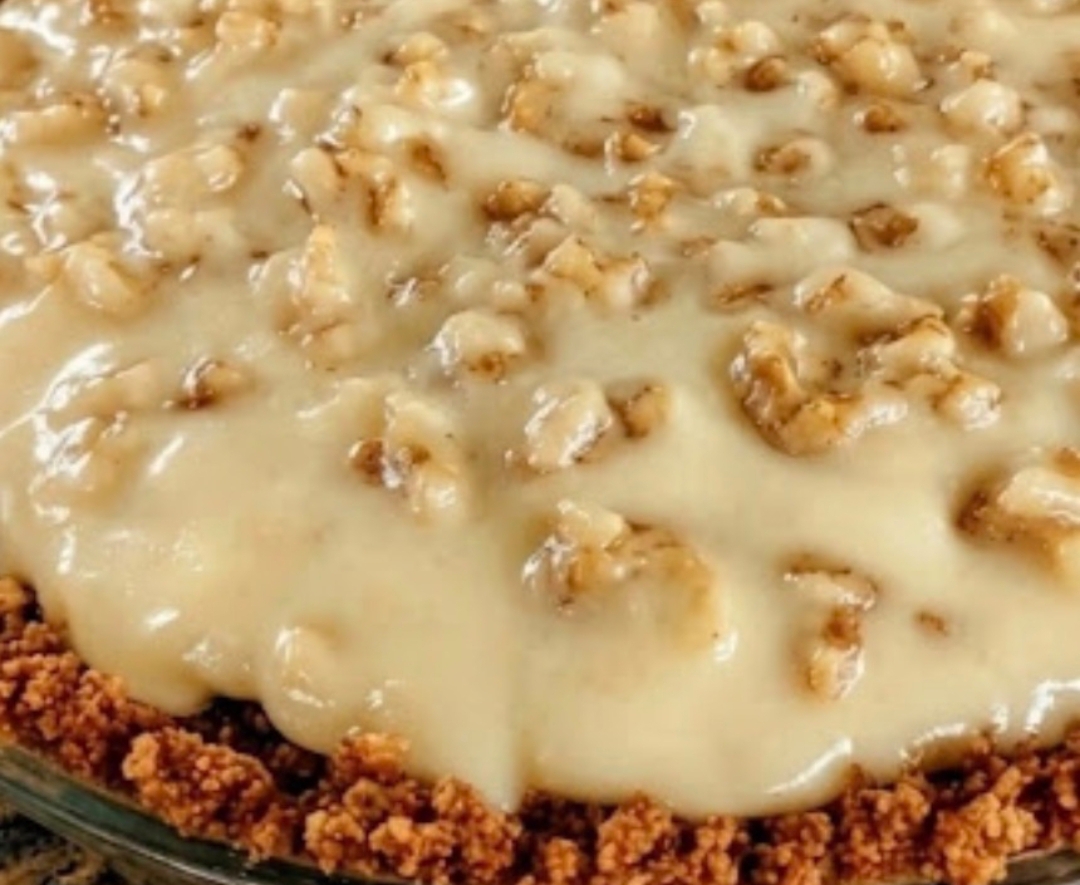
- Incredible Texture Contrast: The smooth, melt-in-your-mouth cream filling is perfectly balanced by the satisfying, buttery crunch of toasted walnuts.
- Make-Ahead Magic: This pie actually tastes better after it has had a few hours to chill and let the flavors meld, making it the ultimate stress-free dessert for entertaining.
- A Real Crowd-Pleaser: It’s rich enough to feel like a holiday showstopper, but simple enough for a casual Sunday family dinner.
Ingredients You’ll Need
The beauty of this recipe is that it relies on a short list of simple, pantry-friendly ingredients. Here is what goes into the bowl, along with a few friendly substitutions.
For the Crust:
- 1 pre-made 9-inch graham cracker or shortbread crust: Store-bought is wonderfully convenient! Substitute: If you prefer a chocolate twist, an Oreo cookie crust pairs beautifully with walnuts. Or, press your own graham cracker crumbs into a pie dish with a little melted butter.
For the Velvety Walnut Filling:
- 8 oz full-fat cream cheese: This must be softened to room temperature. Do not use low-fat or whipped cream cheese, as they won’t set up properly and will make the pie runny.
- 1 cup powdered sugar: Sifted if it’s lumpy. This sweetens the pie without adding a gritty texture.
- 1 teaspoon pure vanilla extract: For that warm, bakery-style aroma.
- 1 container (8 oz) whipped topping: Thawed in the fridge. Substitute: If you prefer to make your own, whip 1 ½ cups of heavy cream with 2 tablespoons of powdered sugar until stiff peaks form.
- 1 ½ cups chopped walnuts: Divided. Substitute: Pecans work wonderfully here too if you prefer a sweeter nut flavor.
Optional but Highly Recommended:
- Chocolate or caramel syrup: For a gorgeous drizzle over the top right before serving.
Step-by-Step Instructions
Let’s get mixing! I promise this process is incredibly relaxing and straightforward.
1. Toast the Walnuts (The Secret to Maximum Flavor!)
Place your chopped walnuts in a dry skillet over medium-low heat. Stir them constantly for about 3 to 5 minutes until they become fragrant and darken just a shade. The Science: Walnuts contain natural oils. Toasting them gently releases these essential oils, deepening their flavor and, most importantly, creating a protective barrier that keeps them crunchy even when folded into a moist cream filling. Let them cool completely before using.
2. Whip the Cream Cheese Base
In a large mixing bowl, add your softened, room-temperature cream cheese, powdered sugar, and vanilla extract. Using a hand mixer or a stand mixer, beat on medium speed for about 2 minutes. You want it to be completely smooth, fluffy, and free of any lumps. Taking the time to do this right is the secret to a silky-smooth pie!
3. Fold in the Fluff
Add your thawed whipped topping to the cream cheese mixture. Switch to a rubber spatula and gently fold the two together. Use a light hand and fold just until the white streaks disappear. Be careful not to overmix, or you’ll deflate the whipped cream and lose that lovely, airy texture.
4. Add the Crunch
Gently fold in 1 cup of your cooled, toasted walnuts, reserving the remaining ½ cup for the topping.
5. Assemble and Chill
Pour the thick, creamy filling into your prepared crust. Use your spatula to smooth the top into an even layer. Sprinkle the remaining ½ cup of toasted walnuts evenly over the top. Cover the pie loosely with plastic wrap and place it in the refrigerator for at least 4 hours, though leaving it overnight is absolutely best for the cleanest slices.
6. Garnish and Serve
Right before serving, drizzle the top with a little chocolate or caramel syrup if you’re feeling fancy. Slice with a sharp knife (wiping the blade clean between cuts) and serve cold!
Pro Tips, Variations & Serving Ideas
Quick Tips for Success
- Room Temperature is Non-Negotiable: If your cream cheese is even slightly cold, you will end up with little white lumps in your pie. If you forgot to take it out of the fridge, unwrap the block and microwave it in 10-second bursts until it yields to a gentle press.
- Prevent a Soggy Crust: If you want an extra barrier between the moist filling and the crust, melt a handful of chocolate chips and brush a very thin layer inside the empty crust before chilling it. It creates a delicious, waterproof seal!
Fun Variations to Try
- Chocolate Walnut Dream: Add ¼ cup of unsweetened cocoa powder to the cream cheese and powdered sugar mixture for a rich, chocolatey base.
- The “Adult” Twist: Add 1 tablespoon of bourbon or Amaretto to the cream cheese mixture for a wonderful, sophisticated depth of flavor.
- Caramel Swirl: Instead of drizzling the caramel on top, swirl ¼ cup of thick caramel sauce directly into the filling right before you pour it into the crust.
How to Serve It
This pie is incredibly rich, so a relatively small slice goes a long way. I love serving it on chilled plates to keep it extra cold. Because of its creamy, nutty profile, it pairs absolutely perfectly with a warm cup of coffee, a cozy chai tea, or even a glass of sweet Moscato or a light, fruity dessert wine. Set it out on your counter for guests to help themselves, or serve it as the grand finale to a hearty, comforting family dinner.
Frequently Asked Questions
Q: Why is my pie filling runny? A: This usually happens for one of two reasons. First, the cream cheese might not have been soft enough, preventing it from emulsifying properly with the sugar. Second, it might not have chilled long enough. Give it a few more hours in the fridge, and it should firm up beautifully.
Q: Can I use raw walnuts instead of toasting them? A: You can, but I highly recommend taking the extra 5 minutes to toast them. Raw walnuts can have a slightly bitter, tannic skin, and they will lose their crunch much faster when mixed into the wet filling.
Q: How long will this pie last in the fridge? A: Covered tightly with plastic wrap or stored in a pie carrier, this pie will stay fresh and delicious in the refrigerator for 3 to 4 days.
Q: Can I freeze this pie? A: Yes! This pie actually freezes wonderfully. Wrap it tightly in plastic wrap and then a layer of foil, and freeze for up to 2 months. When you want a slice, just let it thaw in the fridge for a few hours. It tastes almost like a creamy, nutty ice cream pie when eaten semi-frozen!
Let’s Make Some Sweet Memories!
I truly hope this Walnut Cream Pie brings a little extra joy, comfort, and nostalgia to your kitchen table. There is something so deeply satisfying about creating a beautiful, show-stopping dessert that brings people together, especially when it’s this effortless to make. It’s proof that you don’t need to spend hours over a hot stove to create something that tastes like a million bucks.
If you try this recipe, I would absolutely love to hear how it turned out for you! Did you stick to the classic walnut flavor, or did you try the chocolate or bourbon variations? Drop a comment below to let me know, and please share this recipe with a friend who needs a foolproof, crowd-pleasing dessert idea for their next get-together. Happy mixing, and I’ll see you in the kitchen